Bearing inspection
As a professional bearings manafacturer and supplier in China, we controll the bearing quality very strictly.
1. Purposes
Standardize the bearing inspection standards, control the quality of bearing products, and provide guidance for the acceptance of the products.
2. Scope of application
This specification applies only to inspection and acceptance of deep groove ball bearings purchased by companies.
3. Reference standard
GBT307.1-2005 rolling bearings, tolerances.
GBT307.2-2005 rolling bearing and measuring method of tolerance.
GBT276-94 rolling bearing deep groove ball bearing dimensions
4. Technical requirements
Shape size and rotation accuracy symbol:
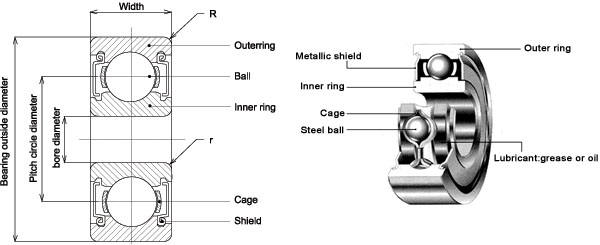
D – bearing nominal diameter; D – bearing nominal diameter; B – nominal width.

Picture :Bearing Construction and Components
Basic code name of bearing: the basic code symbol is used to show the inner diameter, diameter series, width series and type of bearing, which is generally up to five digits, the first is the bearing type code name, and the deep groove ball bearing code is 6. The remainder of the code is described as follows:
1) the inner diameter of bearing is represented by the last two digits of the basic code. The inner diameter of bearing diameter d=20 to 480mm is usually 5 times, but for example, 60/32 series, its inner diameter is the number behind. The corresponding diameters of 00, 01, 02 and 03 are 10, 12, 15 and 17mm.
2) the bearing diameter series is represented by the third digit number of the basic code. 0 and 1 represent special light series; 2 denote light series; 3 express series; 4 represent heavy series. For example, the 6011 bearing diameter series is 0 series.
3) the bearing width series is represented by the fourth digit number of the basic code. There are seven kinds of 0~6, which indicate that the width of the width is widened in turn.
In the post code:
2Z is a dustproof cover on both sides.
2RS represents two sides with seal ring (contact type)
2RZ represents two sides with sealing ring (non contact type)
Non contact refers to seals that are not in contact with their relatively moving parts and are sealed with suitable gaps. This form of seal will hardly produce frictional heat and wear at work, especially for high speed and high temperature applications. Contact friction is large, suitable for medium and low speed working conditions.
5. Inspection methods and points
5.1 packaging and appearance inspection
5.1.1 check the quality certificate, the label on the outer package, the precision grade and the product in the packing. The products with high temperature bearing logo on the package should be tested, and the oil and heat resistance temperature used in the factory inspection report should be verified.
5.1.2 appearance inspection: the rolling bearings are observed with the naked eye. The inner and outer raceways should have no flaking marks and serious wear and a circular groove. All the surfaces of the rolling body should have no spots, cracks and peeling; the cage should not be loose, no breakage, unworn, and the gap between the rolling body is only large.
5.2 the inner diameter, outer diameter, width and chamfering size of the bearing are measured in terms of the value of the table 1 to compare the angle of chamfering, the average internal and external diameter of the single plane, the variable momentum in the single plane and the outer diameter and the average internal and external diameter.
The measurement of bearing size is of high precision, in which the inner diameter of the measurement is usually measured with an inner diameter dial, a measuring diameter with a micrometer, a measuring width with a vernier caliper and a chamfering angle.
5.3 check the vibration and noise of the bearing.
The supplier should provide the relevant inspection report.
At the same time, the following method is used to determine:
Hand feeling: the gap between the inner and outer races of the normal bearing and the rolling body is 0.005 to 0.010 millimeters. For a rolling bearing that has been used for one stage, if the inner race is pinched with the fingers, it must have no obvious noise when it moves in an axial direction.
Rotation method: holding the inner race of the bearing with one hand and rotating the outer seat with the other hand, the bearing should be able to rotate flexibly and feel no radial sway. A variety of methods are comprehensively utilized in the test to make a correct judgement of the technical state of rolling bearings.
